Greetings all!
We are getting ready for our trip to Italy tomorrow. The weather is threatening a snow storm for our trip into Logan tomorrow. Hmmm, not encouraging. My next post will be either from Florence Italy or, sadly, Maggie's Farm.
Arrivederci!
Farm School trainees
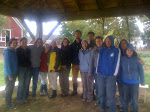
The Lucky Thirteen
Monday, January 31, 2011
Saturday, January 29, 2011
My Review of Cat Flap
Originally submitted at PetSafe

Give your cat access to her litter box without giving her litter box access to your home! This durable cat flap fits any interior door that’s 1” to 2” (2.5 cm - 5 cm) thick. Your cat can come and go from the room where her litter box is housed – even when the door is clos...
Pretty and Pretty difficult to install
By Lee from Maggie's Farm on 1/29/2011
Pros: Good looking
Cons: Poor quality fastener, Directions ambiguous, Difficult to Install
Best Uses: Cats
Describe Yourself: Long-time Pet Owner
Installed this cat flap on a farmhouse door. Previous models had more specific directions, a template for the cutting line, and a back that screws on. This one has little sticky tabs to attach the back. I doubt it will stay together but I installed it anyway now that I have a hole in the door!
(legalese)
Friday, January 28, 2011
Business planning and Raising the first "bents" of the timber frame
This morning we discussed further the elegance and frustration of writing a business plan. Again, we used Nate and Jen's farm plan as the starting point for our questions, going through their proposals and financial documents. This got me thinking about the nature of farming as a business. It is one thing when a new gadget maker runs into trouble and his business folds--no job for him and no gadget for us. Farmers, however, are supplying our food and it was good to know there is support for them: reduced costs in vehicle insurance, utilities, lower land taxes are just a few things we do to make farming work as a business. Wm offered us an article on the "the food movement" which I have read most of and highly recommend to you, too. There is a little blurb about the farm crisis in the 1980's which I remember but had no idea it was related to the federal government focusing its price supports to corn and soy.
Here's the article: http://www.nybooks.com/articles/archives/2010/jun/10/food-movement-rising/
Our afternoon was also elegance and frustration--and some progress. We set about raising the first section of our timber frame sawmill shed. See it and cheer!

Stay tuned for the rest of the building. First, however, is a change of venue. We head for Italy early next week.
Here's the article: http://www.nybooks.com/articles/archives/2010/jun/10/food-movement-rising/
Our afternoon was also elegance and frustration--and some progress. We set about raising the first section of our timber frame sawmill shed. See it and cheer!
 |
| Sophia trims the brace tenon while Brian hangs on |
 |
| Kiyoshi and Emma check the brace |
 |
| Josh helps us see the whole picture before heading out |

We began by hearing the "big picture" from Josh. We had our two "bents" which are upright posts and their top plates. We also had two tie beams that join the bents from front to back and the braces needed to fit together. We checked the fittings to make sure that the mortices and tenons were matched. Once the pieces were ready, we loaded up the horse cart and set off for the mill site.
 |
| The crew |
 |
| Me, carrying an oak brace--wow, it is heavy |
 |
| The whole crew carrying the north bent |
Then we began the death-defying feat of setting these very large pieces of wood vertical. By golly, it worked! Eventually...
 |
| Lifting the bent. |
 |
| Getting the tie-beam in place |
 |
| Stand back and LOOK! |
Stay tuned for the rest of the building. First, however, is a change of venue. We head for Italy early next week.
Andiamo in Italia!
Thursday, January 27, 2011
How I spent my Thursday
I went to bed last night feeling pretty low. Still felt that way today. So I read and dozed and dozed and read. Got a little bored not to mention jealous of my fellow farmers--finishing up the timber frame, working on their fiber projects. So, to pass the time, I began working on a chart of pasture forage.
There are three main types plants that our cows and sheep eat--grasses, legumes and forbs. This chart isn't complete but it has certainly helped me to start to begin to commence to understand what it is that soaks up the sun, takes a four-stomach journey and ends up as milk or meat for us to eat.
The images didn't copy well. The important information is the content upon which I am still... ruminating (sorry, could NOT resist that pun.).
| Name of grass | Image | Sci-name | Bunch or sod | Low med hi | Important info |
|---|---|---|---|---|---|
| Orchard grass |  | Dactylis glomerata | bunch | med | Ratio of digestible/undigestible 1:1 |
| Perrenial rye grass | | Lolium perenne | bunch | low | Ratio of digestible/undigestible 4:1 |
| Tall fescue | | Festuca arundinacea | bunch | tall | |
| timothy | | Phleum pratense | bunch | med | |
| Kentucky bluegrass | | Poa pratensis | | low | |
| Smooth bromegrass | | Bromus inermis | sod | tall | |
| Reed canarygrass | | Phalaris arundinacea | | tall | |
| quackgrass | | Elytrigia repens | sod | med | |
| Canada bluegrass | | Poa compressa | | | Confused with Kentucky bluegrass, cuts gums –improve fertility to grow Kentucky |
| Meadow fescue | | Festuca pratensis | bunch | med | Gorws with timothy, wet soils, close grazing and lax grazing OK |
Need to have 30 to 50% legume GROWING IN PASTURE
| Name of Legume | Image | Sci-name | | details |
|---|---|---|---|---|
| White clover | | Trifolium repens | | Grows low to ground, via stolons, shallow rooted |
| Red clover | | Trifolium pratense | | Deeply rooted, upright grow, good with tall grasses, lives only two years |
| alfalfa | | Medicago satvia | | With bromegrass and canary grass, withstand drought |
| Birdsfoot trefoil | | Lotus corniculatus | | Can grow on poor soil, tricky to grow, |
| vetch | | | | Viny legume |
| | | | | |
Animals love forbs, we call them weeds, edible at early stages
| Name of forb | Image | Sci-name | notes |
| plantain | | Plantago major | |
| dandelion | | taraxacum | |
| chicory | | | |
Wednesday, January 26, 2011
Biodynamics and garden planning
Carlen led our discussion of biodynamic farming this morning, helping us to understand a bit more about this "farm as an organism" apporach to growing food. Since I'm still clarifying in my mind what this means, I'm going to snip out a piece of Wikipedia to share with y'all.
Biodynamic agriculture is a method of organic farming that treats farms as unified and individual organisms,[1]emphasizing balancing the holistic development and interrelationship of the soil, plants, animals as a self-nourishing system without external inputs[2] insofar as this is possible given the loss of nutrients due to the export of food.[3]
Regarded by some as the first modern ecological farming system[4] and one of the most sustainable,[5] biodynamic farming has much in common with other organic approaches, such as emphasizing the use of manures and compostsand excluding of the use of artificial chemicals on soil and plants. Methods unique to the biodynamic approach include the use of fermented herbal and mineral preparations as compost additives and field sprays and the use of an astronomical sowing and planting calendar.[6] Biodynamics originated out of the work of Rudolf Steiner, the founder ofanthroposophy.
In comparing biodynamics with organic farming, each system has requirements to do and to NOT do. Both are aiming to support plant growth by providing an "ecological system." The tricky parts about comparing these two systems are first, I don't know much about the specifics of the biodynamic practices and second, the practices prescribed by organic farming now relates to minimal standards, which most organic farmers exceed.
Sorry, that's all I have for today. Not feeling that great. I do have some beautiful, iced farm photos. Enjoy!
 |
| Looking South from Maggie's Farm |
 |
| Iced fruit on the branch |
 |
| Out the barn towards the "horse bus stop" |
Tuesday, January 25, 2011
Talking Tuesday
This morning, we completed our crop-planning sequence with Nate. I feel confident that if I had a CSA and some land and some soil amendments and the right seeds, I could lay out a crop plan, a greenhouse schedule and estimate what I will spend and what I might make. All the work in between the planning and the making is still a bit fuzzy. I look forward to making that middle piece--the action piece--come alive on the farm.

In the afternoon, we enjoyed a visit from Deb Habib of "Seeds of Solidarity" farm and educational organization.
Our evening was blessed with a sweat lodge ceremony led by Andrew. What a wonderful experience!

In the afternoon, we enjoyed a visit from Deb Habib of "Seeds of Solidarity" farm and educational organization.
Our evening was blessed with a sweat lodge ceremony led by Andrew. What a wonderful experience!
 |
| Snow melting away from the fire |
 |
| Caitlin Brian and Justin, preparing for the sweat |
 |
| Sophia Rebekah and Andrew watch the fire |
Monday, January 24, 2011
Tool sharpening and Planning the garden
We had a lovely adventure at the NOFA-NY conference this weekend which included sessions on many different aspects of farming, lovely meals, seeing Air Force One (or getting stuck in the presidential traffic) and in general enjoying the company of farmers. Here are a few shots from this past weekend:
Our group started off the week with Carlen. After discussing the parts of tools and describing their upkeep, Carlen led us in brushing off, filing and oiling our garden tools. The sound was reminiscent of a tough day at the Dentist office mixed with the sounds of chalk scraping the chalk board. Not pretty on the ears but the result of shiny tools was delightful.
Our afternoon session began with each of us sharing our experiences at the Nofa conference. After that was complete, we started in on our garden planning with Carlen. We discussed the parameters of our garden planning--how to divide up the work, how to choose plants, how to design beds and we decided to see the scope of our wishes as we begin to plan. We'll meet with Carlen again on Wednesday with a group list of desired plants for our homestead garden.
 |
| Sophia, Emily and Emma |
 |
| Icy sunrise at Saratoga Springs, NY |
 |
| Andrew, Just and Theo |
 |
| Kiyoshi and Caitlin |
 |
| Rebekah, Betsy and Nora |
 |
| Carlen and Brian looking at 'the edge" |
 |
| Sophia and the garden fork |
 |
| Kiyoshi "brightening up" a shovel |
Our afternoon session began with each of us sharing our experiences at the Nofa conference. After that was complete, we started in on our garden planning with Carlen. We discussed the parameters of our garden planning--how to divide up the work, how to choose plants, how to design beds and we decided to see the scope of our wishes as we begin to plan. We'll meet with Carlen again on Wednesday with a group list of desired plants for our homestead garden.
Thursday, January 20, 2011
Icy Day
We're between storms here. Today was sunny and bright.
 Tomorrow we head to upstate New York to visit a biodynamic farm and then to the NOFA New York winter conference.

Straight from the horse's mouth
It is called "floating" but the action doesn't resemble anything I would remotely call "floating." Take a file the size of a deck of cards, put it on a 2.5 foot screwdriver handle and stick in it a horse's mouth... File away.
Here are some photos of the vet's visit:
Our afternoon session was a continuation of the crop planning series with Nate. He's the new farmer at Northampton's Community farm space--Crimson & Clover is the name of the farm. You might know them better by their tag-line: Jen and Nate are Great! Today we calculated how much seed needed for each of the practice crops and the cost of that seed.
Here's an example laid out. My apologies to the fans of okra. We assumed that four 1/2 pound deliveries to the 150 member CSA would be made through the year. In order to produce this much okra, but spread out through the season, we would need to make four plantings of approximately 200 plants each. For this, we would need approximately 6 ounces of seed. Great! Only six ounces of seed is a reasonable investment. Wait, how much do those seeds cost? If I purchase non-organic seeds, the price is approximately $10 an ounce. If I choose organic, the price is around $27 an ounce. Our group chose to plan for 3 ounces non-organic and 3 ounces organic bring a seed-cost of around $110. For Okra? I'm sorry, I just don't appreciate this vegetable enough to spend three times as much for seed as our other crops. Further, New England isn't known for its okra growing climate, so it is a risky crop anyway. I'm glad for the exercise, Nate, but we'll pass on the okra.
Floating is needed when a horse's teeth don't grind down evenly. Our dear Ruby needed a little work and she stood for it fairly patiently.
Here are some photos of the vet's visit:
 |
| Olivier listens to plan about Ruby |
 |
| Visiting vet |
 |
| Nate and his onion sweatshirt |
Here's an example laid out. My apologies to the fans of okra. We assumed that four 1/2 pound deliveries to the 150 member CSA would be made through the year. In order to produce this much okra, but spread out through the season, we would need to make four plantings of approximately 200 plants each. For this, we would need approximately 6 ounces of seed. Great! Only six ounces of seed is a reasonable investment. Wait, how much do those seeds cost? If I purchase non-organic seeds, the price is approximately $10 an ounce. If I choose organic, the price is around $27 an ounce. Our group chose to plan for 3 ounces non-organic and 3 ounces organic bring a seed-cost of around $110. For Okra? I'm sorry, I just don't appreciate this vegetable enough to spend three times as much for seed as our other crops. Further, New England isn't known for its okra growing climate, so it is a risky crop anyway. I'm glad for the exercise, Nate, but we'll pass on the okra.
Tuesday, January 18, 2011
The photograph I wish I had taken...
Our youngest layer hens are learning to cope with snow. Last week, after our big snow storm when the drifts in the chicken yard average 12 inches deep, the pullets came bounding out of their coop and into the snow, fluffy-butt high. They flapped and squawked, trying to make their way to food and water. We shoveled paths for them as well as laying down chaff to give them munchies.
Today, we have a little snow storm beginning. There was about an inch of snow on the ground when I opened the pullet's coops. They squawked. They flapped but they did not come out. I pushed aside some snow in from their door and made a little path to their water and a few brave, thirsty souls followed me out and got a drink. I took care of some other chores and when I came back with a shovel to clear the yard, the pullets were still not coming out. BEGinning at their door, I scooped up the snow down to where the bigger coop is. As I reached that gathering area, I turned around and saw a beautiful single-file line of black and white birds following me down. It was an exquisite sight, with their red combs contrasting with the white and grey background. It reminded me of the riddle: What's black and white and red all over? Pullets in a snow storm!
Today, we have a little snow storm beginning. There was about an inch of snow on the ground when I opened the pullet's coops. They squawked. They flapped but they did not come out. I pushed aside some snow in from their door and made a little path to their water and a few brave, thirsty souls followed me out and got a drink. I took care of some other chores and when I came back with a shovel to clear the yard, the pullets were still not coming out. BEGinning at their door, I scooped up the snow down to where the bigger coop is. As I reached that gathering area, I turned around and saw a beautiful single-file line of black and white birds following me down. It was an exquisite sight, with their red combs contrasting with the white and grey background. It reminded me of the riddle: What's black and white and red all over? Pullets in a snow storm!
Monday, January 17, 2011
Monday January 17
Our group spent the morning learning how to stick weld and MIG weld. I'm borrowing photos from Kiyoshi because I didn't have my camera with me this morning.
We returned to Ron Mott's shop to learn how to stick weld. Welding is melting metal onto other metal in order to create a new form or repair a tool that has broken. Soldering is similar, but easier because the solder metal is very easy to melt and doesn't create a structural bond. The whole process reminded me of using a glue gun but of course, very different in scale and use!
First we used a "stick weld" technique. We had this huge machine with knobs and dials and switches. there were two hoses coming out of it--one with a very large, spring-loaded clamp and another with a handle. The clamp was attached to the welding table. The handle had a place to insert this white-ish stick (reminded me of a incense stick with a metal core). The big machine generated electricity and a circuit was made by the clamp through the table and into the piece that needed welding. The other part of the circuit was the "incense stick" on the handle. When one touches the stick to the metal to be welded, the circuit is complete and a LOT of electricity flows through, heating up the stick and the place where it was attached. If one just touches and keeps close this tricky stick, then an arc of electricity jumps the gap, still full of heat but the circuit is controlled as is the melting of the stick. Well, I'm going to use the word "control" very loosely, here, but I felt like I didn't have much control. I was in the running for Queen of the Sticks (the stick gets attached to the metal being welded and one is stuck. )
There is a substance that coats the stick--making it look like incense--and that is the "flux" a substance the melts and pushes away the oxygen that might make little bubbles in the metal stick as it melts and attaches to the weld. I think we breathed a lot of that flux in, today.
After we each had a chance to try welding an object together, Ron brought out the MIG welder (MIG standing for metal inert gas--also known as a wire welder) which was actually MUCH more like a glue gun than the stick welding. There is also another very large machine with dials, switches and hoses coming out. The clamp to make the circuit was the same but the handle was different. There was only a handle with a trigger of sorts. When the trigger is pressed, a think wire comes out (like a glue stick) from the hose and becomes the welding material. This was easier to use because one didn't have to control the electric arc to start the melting. Our next session with Ron will be back on the farm where we will do some practical applications of these skills.
Fiber arts,
 |
| My wool, picked apart and ready for carding. |
 |
| Jill collecting fiber from her rabbit. |
 |
| Nora, sorting her green wool |
 |
| Jill, showing us "wet felting" |
 |
| Jill showing Nora and Sophia how to spin |
 |
| Jill demonstrating the drum carder. |
 |
| Kiyoshi beginning to card his wool |
 |
| Sophia's wool-plum, cranberry and blue |
 |
| My blues wool, sorted into piles |
Saturday, January 15, 2011
Friday January 14--The Business of Business
Wm led a discussion of the business plan for Crimson and Clover Farm. (more details soon)
We enjoyed a presenation inthe afternoon from Ben Shutes of Hearty Roots Farm, Tivoli New York. (more details soon)
We enjoyed a presenation inthe afternoon from Ben Shutes of Hearty Roots Farm, Tivoli New York. (more details soon)
Thursday, January 13, 2011
Shoveled out and back to work
Today, the sun was shining again.
Returning to the greenhouse, much work was accomplished on the timber frame project. I was happy to welcome Emma and Nick for a visit; especially happy because they worked on two mortises while I finished the top tenon.
On returning to the farm, we saw the first of the two new barn doors being installed. It is beautiful!
Our afternoon session was with Nate and our new grower Steven. We continued on with our case studies of vegetable crops. We brainstormed the parameters of a growing season and then set about to figuring out how to decide when a crop ought to be sowed (either in the greenhouse or directly into the soil). We had to keep in mind the following: the market (don't give butternut squash in August), when the soil is ready (dry enough, warm enough, how long the growing process takes, how much is in the green house, the harvest window, when the first frost and last frost fall and how to balance out all the work throughout the season, . Here is my example:
 I want to put a nice healthy head of bok choy in the CSA box each week, for twenty weeks, starting on June 1. I need to plant new bok choy seeds in the greenhouse starting March 15 through July 29. Bok Choy is a hardy plant that can go out before the last frost, so starting mid-April, I plant my first batch of transplants and harvest on June 1 to deliver that day! And each week, more bok choy will be harvesting until the last frost in September. That's a lot of bok choy. Nate let us in on a grower's little secret. You can purchase seeds from different varieties of a vegetable that ripen at different times. The work process is the same but instead of planting one week's worth of one kind of seed, one would plant two week's worth of two seeds--one of a quicker ripening and one of a later ripening. Then, you have two harvests for the time spent planting out.
 |
| Emma, learning to bore |
 |
| Emma, chiseling |
 |
| Emma and Nick cleaning out a mortise |
 |
| Nick, boring. |
On returning to the farm, we saw the first of the two new barn doors being installed. It is beautiful!
 |
| The team putting up the first door |
Our afternoon session was with Nate and our new grower Steven. We continued on with our case studies of vegetable crops. We brainstormed the parameters of a growing season and then set about to figuring out how to decide when a crop ought to be sowed (either in the greenhouse or directly into the soil). We had to keep in mind the following: the market (don't give butternut squash in August), when the soil is ready (dry enough, warm enough, how long the growing process takes, how much is in the green house, the harvest window, when the first frost and last frost fall and how to balance out all the work throughout the season, . Here is my example:

Wednesday, January 12, 2011
Another View
For another view of life on the farm, check out this blog:
http://barnnone.blogspot.com/
Ha!
http://barnnone.blogspot.com/
Ha!
Nor'easter blows in but Timber frame work continues
What a storm! But it was beautiful and manageable so here is how our day went.
We stumbled through the snow to get our chores done. The chickens needed their yard shoveled as the snow was drifting higher than their fluffy little bottoms. The older hens pretty much stayed in the coop but the pullets were out, exploring. We spread chaff from the hay barn on the cleared ground and this was exciting for the brave birds. They nibble at the seeds and leaves that have fallen out of our hay bales and they use this nutrition to make beautifully yellow egg yolks.
We stumbled through the snow to get our chores done. The chickens needed their yard shoveled as the snow was drifting higher than their fluffy little bottoms. The older hens pretty much stayed in the coop but the pullets were out, exploring. We spread chaff from the hay barn on the cleared ground and this was exciting for the brave birds. They nibble at the seeds and leaves that have fallen out of our hay bales and they use this nutrition to make beautifully yellow egg yolks.
Next, our group headed out to work on the timber frame project over at Sentinel Elm farm. Even though the snow plow had come through, things were tough. The black truck has enough space for the group but does not have four-wheel or all-wheel drive.
 |
| First try |
 |
| Second try |
It was toasty warm in the green house and we were glad to be there, working. I'm working on my second post and today began the cutting. First I reacquainted myself with the markings on the timber, then I sawed off the excess on top and bottom. Carving out the tenon was the next task. Josh lent me the pull saw or tokutaro for this work. This saw is thin and works best when you pull on it. Wow, what a difference. It was easier to start and aim the cut and get it done. Even with a great tool, I still had a lot of work to do and have the blisters to prove it.
 |
| The timber, ready for cutting |
 |
| Cutting the "pages" with tokutaro |
Subscribe to:
Comments (Atom)